Tuesday, December 20, 2011

Dotted Christmas Tree

This is my second holiday design this year. 
The design I had on my nails (click here Holiday Glitter for a picture) finally started to chip today. So I decided to come up with another design to last until Christmas. After the Christmas craziness, I'm going to paint a snowflake design. 


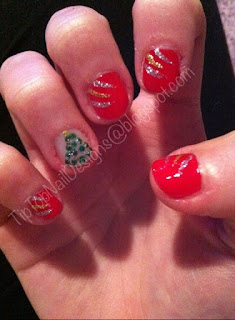
So I didn't have a design in mind when I started painting. I started with a dotted Christmas tree topped with a gold glitter dot and added silver glitter flakes and a glitter topcoat. 


 Then I painted my other nails red with wispy swipes of gold and silver glitter.


Monday, December 19, 2011

Holiday Glitter

Merry Christmas! I love this time of year. 

Music, baking, red, Jesus, 
green, angels, eggnog, Jesus, 
giving, trees, snow, Jesus, 
hot chocolate, gifts, lights, Jesus, 
songs, family, friends, . . .and Jesus! 

This is my first holiday design this year. Hopefully there will be more holiday designs to come. For this design, I started with a white base topped with a coat of a pearl white polish. Then I used almost two coats (I didn't want two full coats and too much glitter) of China Glaze Party Hearty which debuted in 2010. 


Be on the lookout for more designs!

Saturday, November 19, 2011

Peacock Feathers

My friend Rosalyn dressed as Mrs. Peacock from Clue for Halloween and asked me to paint her nails. This is what I came up with.


Speaking of Halloween, I dressed up as Batman (complete with a cape)
for class and got extra credit for it!! 

Thursday, August 11, 2011

REVIEW: Sally Hansen Insta-Dri Anti-Chip Top Coat

I saw another blogger reviewing this top coat and I wanted to try it. 

The brand of top coat I typically use is Beauty Secrets, which I buy in a huge round bottle at Sally Beauty Supply for about $5. This one is my favorite of all the top coats I have tried. So far. I have tried Seche Vite and the first time I thought it was great. But the more I used it...I didn't like it as much and I think it's super thick. Almost too thick. It's great that you can apply it to wet polish and you know that it won't smudge (which is wonderful - especially with Konad polish), but it's so thick that I end up with a big goopy mess. I don't like thick polishes. 

Anyways... back to Sally Hansen Insta-Dri Anti-Chip Top Coat. 
I think this is a great top coat. 

Price: 
Sadly, I do not remember how much I paid for it. 
I know it's less than Seche Vite, which is like $9. 
If I had to guess, I would say I paid $5 or $7. 

Chipping: 
 I painted my toes for vacation (click HERE if you want to see) using this top coat on Wednesday, Aug 3. We left on Friday, Aug 5 and didn't return until the following Tuesday, Aug 9. At the time of writing this, it's Thursday, Aug 11...and my toes still look great. No chips. At all. 
Even after five days of sun, sand, and waves. 

Application: 
 This polish is thin. Really thin. More like runny. It does go on smoothly though. 

Brush:
It seemed smaller than a regular nail polish. 
But it doesn't really affect the application. 


Here is the package:

Here is the bottle: 


Overall, I really like this top coat. 
I would definitely recommend it.

Tybee Toes

I just got home from vacation!
I wanted to share with you the design I painted on my toes for the trip. 


Pretty simple. Well, actually, very simple. 
It’s a lavender purple nail with three flower decals in the corner. The base color is a lavender color polish with the words "love & beauty" printed on the bottle. I picked it up at Forever 21. I love this polish. It's my favorite shade of purple!


The decals are an unknown brand. It was a little sheet of random decals I found in my nail polish drawers. We went to Tybee Island. For those of you who don’t know where that is, it’s in Georgia near Savannah on the east coast. 

Another design inspired by this vacation is in the works and will hopefully be finished and posted soon, so watch for it! If you're interested more in my trip, click HERE.

Thursday, August 4, 2011

Harry Potter

In honor of the final Harry Potter movie, I came up with this simple design.
 (And yes, I know I'm way late.)


I myself have not seen the movie yet. I'm actually a little behind...I haven't read any of the books (even though I own #3 somehow) and have only see the first five movies. I hope to watch the sixth one and part one of the seventh soon so that I can see the final movie while it's still in theaters and before I go back to school.


Again, this design is very simple. 
The center nail is the "HP" logo on a golden background. 
The Gryffindor nail is red and gold in a checker pattern. 
The Ravenclaw nail is a blue nail with a thick diagonal gold line.
The Hufflepuff nail is divided vertically, painted half black and half yellow. 
The Slytherin nail is divided into four diamonds, two green and two silver.


Tuesday, August 2, 2011

Ke$ha

I was given concert tickets for my birthday back in June. 
The concert was this past Saturday night.
Can you guess who it was?

KE$HA!! 

Here is the design I painted for the concert:

 The thumb and ring finger are a bright glittery purple with Ke$ha's signature dollar sign in gold glitter. The remaining fingers are a shimmery yellowy gold stamped with Konad leopard print. A corner of each gold nail is a purple triangle set off by a thick, glittery, gold line.


If you haven't heard of Ke$ha, you  probably are old
...or you've been living under a rock for the past three years.   

 Ke$ha first mainstream exposure was as the female vocal part in Flo Rida's single Right Round in early 2009. Her first single Tik Tok was released in later that year and took the music scene by storm topping the charts in 11 countries. Her first album, Animal, was released in January 2010 and her second album, Cannibal, was released in November 2010. Her tour kicked off in Portland, Oregon on February 15 of this year and is scheduled to end on September 20 in Phoenix, Arizona, hitting Australia and Europe as well. And Ke$ha loves glitter. 
And wears blue lipstick.

 Anyways, back to the concert.
Ke$ha puts on quite a show! ...After you sit through her TWO opening acts. 
The first act was a little scrawny guy (didn't catch his name) that rapped for 45 minutes. He was boring but his music was good, at least. The second act was called LMFAO. It was two guys who danced and rapped. They were more entertaining than the first act, especially when they tossed an inflatable ZEBRA around into the crowd. Yeah, I said zebra. At regular concerts you smack around a beach ball; at a Ke$ha concert you throw around a zebra! LMFAO played for almost an hour and a half. They just kept going..and going..and going..and you get the idea. (Side note: after the concert where I had no clue who these dudes were,  I found out that they were apparently pretty popular because everybody was like "you saw LMFAO!?!?" and totally knew who they were already haha) They played almost as much as Ke$ha!! I was tired of hearing them and eventually just sat down on the floor and waited. I was SO happy when they were finally finished!
 

When Ke$ha finally hit the stage, she opened with Sleazy, the tour's namesake, followed by Blow and Take it Off. She gave us a short preview of her new song Dirty Picture, then played BlahBlahBlah, Party at a Rich Dude's House, Backstabber, Cannibal, and The Harold Song. Ke$ha showed a more serious side as she revealed her favorite song she's written is Animal and even got a little choked up after singing it. Then she played Dinosaur. Ke$ha pulled a guy from the audience, saran wrapped him to a chair, and sang Grow A Pear to him. The show ended with Your Love is My Drug and Tik Tok. And then some of the equipment above the crowd caught on fire. Pretty sure that WASN'T part of the show because it started sparking down ONTO the crowd and the arena staff started freaking out. I thought the huge spotlights were going to fall! Ke$ha came back out and said she wanted to sing one more for us and re-emerged in a glow-in-the-dark leotard and helmet with big feathers coming out of it like a mohawk and sang We R Who We R.

Wednesday, July 27, 2011

Under the Sea

The seaweed is always greener
In somebody else's lake
You dream about going up there
But that is a big mistake
Just look at the world around you
Right here on the ocean floor
Such wonderful things surround you
What more is you lookin' for?


The Little Mermaid. 
Brings back memories doesn't it? 
Who doesn't love this movie!? 
Well, I have always liked this movie.


I know there are only four nails in this design. 
Let me tell you why. 
Instead of trying to paint Ariel and Flounder directly onto the nail and risking mess-ups, I made them into stickers. Well that turned out great. Ariel was a little big. Flounder looked just like a picture. I had some trouble painting Ariel's face, and being the perfectionist I am, I tried over and over again 
(painting over it each time - this made her face really thick) but I could not get her face to look right.

It just wasn't working.
So I painted her facial features as their own sticker instead of painting them onto her face. Well that didn't work either. I painted her eyes too big and they wouldn't fit on her face.
 
Here is a picture of all the stickers.


Since Flounder turned out so great, I decided to continue with the design instead of throwing all of it away just because Ariel wasn't working. I don't think Flounder could have turned out any better. I decided to try putting Ariel on a nail without a face and then figure out what to do, even if it meant posting the design with her faceless. Well that turned out horribly. 
1. She was gigantic and would hardly fit on a nail at all. 
2. She was too thick (too many polish layers because I messed up)
3. She wouldn't lay down flat on the nail. 
And finally, when I tried to stick her on the nail and angle her to get as much of her onto the nail as possible, she tore. Not once. Not twice. She ripped in THREE different places.

So I gave up. 
When you see the picture, you'll understand why. 

FAIL.


To finish the design using only Flounder,
I painted three other nails that would go long with the design.
A starfish with bubbles.
A seashell with bubbles.
A beach with a crab and REAL grains of sand.


Each little clam here know how to jam here
Under the sea
Each little slug here cuttin' a rug here
Under the sea
Each little snail here know how to wail here
That's why it's hotter under the water
Ya we in luck here down in the muck here
UNDER THE SEA!!!!


Lovely Little Ladybugs

A ladybug design is always cute for summer. 
There are so many variations and different designs you can do. 
Just get creative! 
This is definitely one of my favorite variations!  


 Little ladybugs peeping from the grass. 


Friday, July 15, 2011

Ahoy Matey!

“As we sail thru life, don't avoid rough waters, 
sail on because calm waters won't make a skillful sailor."

Sailor. Bluejacket. Boater. Cadet. 
Deck hand. Mariner. Mate. 
Old Salt. Sea Dog. Shipmate. Swabbie.
 Nautical themed nails seem to be popular right now,
so I thought I would give a shot at my own design.

Rustic and worn boat wheel. 
Blue triangle and stripes with gold line.
Lifesaver. 
Blue french, red stripes, and white stars.
Anchor.


Wednesday, July 13, 2011

The Proposal


I'm engaged!!!! 
June 2, 2011 
Unfortunately I've been so busy with class that it's been over a month 
and I'm just now posting this design. 
But it's still exciting!
We went on a picnic. 
This design is for those memories on that picnic on that special day. 

Blanket with picnic basket in the grass. 
A spider lurking in the grass that eventually bit me.
My ring! 
We stargazed and saw the Big Dipper.
 The duck that followed us around the whole time we were there.


 Here is the duck friend that we made.


 The "before/I-have-no-idea-what's-coming" shot


 And the "after" shot.


Another view of the design.


And what I know you've all been waiting for... 
the RING! Perfection.

Friday, July 8, 2011

Wacky Watermelon

"When do you go at red and stop at green? 
...eating watermelon!" 
(according to my 8 year old cousin). 


A summer staple. 
A Fourth of July necessity. 

This design is really cute and fun for summer. 
Instead of a watermelon design that looked like a green french tip, 
I decided to switch things up and turn the 
watermelons all different directions to liven it up.
 The base color is a bright little-bit-darker-than-bubble-gum pink. 
Add random and alternating light or mint green tips and stripes to be the rind. 
Add contrasting smaller stripes of a darker green to the 
light green to be the stripes on the exterior rind. 
Finish off with a few black dots here and there for seeds and a top coat.

Monday, July 4, 2011

Fireworks

Happy 4th of July!!!!

I saved the best for last. 
This is the final design of my four-part Fourth of July nail design series. Of all four designs, I think this one is the most festive without overdoing it. It's simple but it looks great! I think of the four designs I've done for the Fourth of July, this one is my favorite! It is pretty simple as well. All nails are painted red. The smaller toes have white and blue fireworks coming from different corners. The big toe has two sets of fireworks opposite of one another with three pearl white stars in the center.


Sunday, July 3, 2011

"Star Spangled Banner"

Happy (almost) 4th of July! 

This is the third design in my four-part Fourth of July nail series.
 This design divided the nail into three sections: white, red, and blue. 
The white section has three pearl white stars 
(which are a little hard to see unless the light catches them just right) 
and dots line the red and blue sections.
 The smaller toes are painted red with white, blue, and glitter fireworks coming from one corner. 


In this picture the stars are more visible.


No copyright infringement intended.

Saturday, July 2, 2011

"You're a Grand Old Flag"

Happy 4th of July! 

This is the second design in my four-part Fourth of July nail series!
This is a simple design that screams patriotism. All toes are painted red. The big toes have white stripes and a diagonal blue triangle in one corner with pearl white stars. I left the smaller toes just plain red. This design would also look great on nails with the flag design on the ring finger. 


And a close-up.


No copyright infringement intended. 

Friday, July 1, 2011

"Stars and Stripes Forever"

Happy (almost) 4th of July!!

This is the first design in my four - part July 4th nail series.
This design is almost painfully simple. 
All toes are painted white. 
Each nail is lined on both sides by alternating red and blue stripes. 
The big toe has three stars in the center.
Each little toe has a single small star in the center.


The stars are hard to see unless the light hits just right. 
When they reflect light, the stars look green, pink, and orange. 


No copyright infringement intended.

Thursday, June 30, 2011

Fourth of July Preview!

Happy 4th of July! 
 
This is a preview of the four designs I painted 
for July 4th.
They will be posted soon! 


Be on the lookout for the following posts! 

"Stars and Stripes Forever"
"You're a Grand Old Flag"
 "Star Spangled Banner"
Fireworks


No copyright infringement intended.

Wednesday, June 22, 2011

My Latest Project

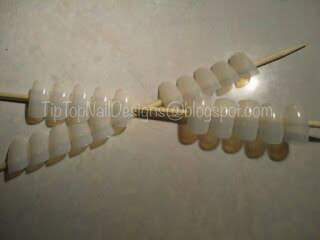
I have two fake hands that I practice on and paint, but its such a hassle to remove the polish off them. Especially glitter or anything black - it just smears everywhere! So this is my solution to my own problem. 

Fake nails + wooden skewers and glue = perfect nail displays!!


These are the fake nails I am using. 
They are Kiss active square nails, medium length. 
I got this pack of 200 for about $4.


This is what the inside of the package looks like. 
It comes with Kiss maximum speed nail glue. 


These are the wooden skewers, 
which also came from Walmart. 
This pack of 100 skewers was less than a dollar. 


Simple. I glued the nails to the skewers using craft clue (I'm sure regular glue or any glue would work but craft glue was all I could find). Viola! Nail displays that I can paint and easily maneuver by holding the edges of the sticks. The best part is I don't have to worry about removing any polish when I'm done with one design to start the next one; I just move to a new set of nails on the stick!

LinkWithin

Related Posts with Thumbnails